In this tutorial, we will show how you can create a powerful DSL (domain-specific language) with Kotlin and the builder pattern. First we will discuss some features provided by Kotlin. Afterward, we are going to discuss our example. In the last part, we are going to implement the DSL step by step.
What is a DSL – Domain-Specific Language
Martin Fowler states that a Domain-Specific Language (DSL) is a computer language that’s targeted to a particular kind of problem, rather than a general-purpose language that’s aimed at any kind of software problem. It is distinguished between external and internal DSL. External languages are provided by other systems. For example, the SQL language is an external DSL for most users of databases. A database engine however sees the SQL as an internal DSL.
Use Cases of Domain-Specific Languages
Among others typical use cases are HTML, SQL Querys, CSS or regular expression builders. Or in general configuration files.
With Kotlins core features you can create internal DSL for complex hierarchical problems.
NEW: The final source code is available on our public GitHub repository. You can find a link in the reference section.
Kotlin – Typesafe DSL builders
Kotlin provides some native functionality to implement typesafe DSL builders in a semi-declarative manner. By declaring well-named functions as builders and in combination with function literals/lambda functions with certain receivers, you can create statically typed builders. You can check out the official reference page for more information (we put the link at the bottom of the page).
Scope Functions – A perfect DSL illusion
Kotlin provides a concept called “Scope Function”. A scope function lets execute some code (with a certain scope) on an object. The scope function of our interest is called “apply”. Scoped functions called with “apply” are mainly used for object configuration. The context object is available as a receiver (this). The return value is the object itself.
Therefore it is well-suited to be used in our builder configuration.
In our example, you will find the following code. It represents an extension function on the ItemBuilder class. The input argument is a function literal with receiver. In other words, a lambda function gets (in this case) an ItemBuilder instance as an input argument.
In the body of the function, a new builder is created. Afterward, the builder is configured by using the “setup” function within the scoped apply function call. The return type is the builder itself, which is afterward used in the addChild call. The second code snipped illustrates how to use the “item” extension function.
fun ItemBuilder.item(setup: ItemBuilder.() -> Unit) {
    val builder = ItemBuilder().apply(setup)
    addChild(builder)
}
{
// within the scope of a ItemBuilder
// we have access to the extension function "item"
...
item {
// within the scope of the "new" itembuilder
// this code block is the "setup" input argument
}
}Example Description
This Kotlin DSL tutorial will implement some basic functionality of a declarative user interface. This example is inspired by the Qt QML language, a powerful declarative JSON-like language. We will implement, however, only a small set of functionality to show the power of Kotlins type-safe builders. You can find a link to the full QML documentation in the link below.
Item – the base type
The base type of our user interface objects will be called “Item”. It provides the geometrical aspects of the elements. All objects in our example will inherit this class.
QML
Item {
    x: 10
    y: 20
    width: 30
    height: 40
}
Kotlin
item {
    x = 10
    y = 20
    width = 30
    height = 40
}
Derived types – Rectangle and Image
We will implement to derived types. The rectangle class has a background color and the image class has source URL string. Both classes inherit the properties and functionality of the item class.
QML
Rectangle {
    width: 100
    height: 100
    color: "red"
}
Image {
width: 100
height: 100
source: "pics/qtlogo.png"
}Kotlin
rectangle {
width = 100
height = 100
color = "red"
}image {
width = 100
height = 100
source = "pics/qtlogo.png"
}Element composition
The user interface can be composed by adding items to items. You can add any derived type. This will show the complexity of inheritance chains, both in the domain model but also in the builders.
QML
Item {
width: 100
height: 100
Rectangle {
width: 50
height: 50
color: "red"
}
Image {
    width: 100
    height: 100
    source: "pics/qtlogo.png"
}
}Kotlin
item {
width = 100
height = 100
rectangle {
width = 50
height = 50
color = "red"
}
image {
    width = 100
    height = 100
    source = "pics/qtlogo.png"
}
}Kotlin DSL Builder Example Implementation
Packages Dependency
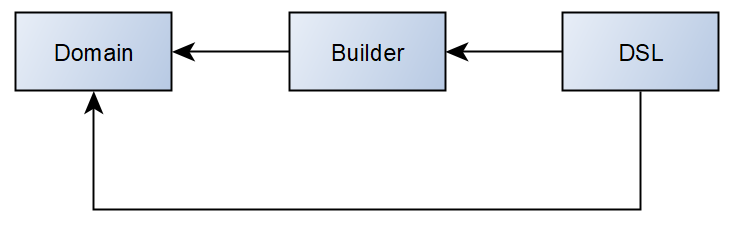
The following image illustrates a correct dependency flow for implementing a solid DSL language in Kotlin. The domain objects are the inner circle with no dependencies on other packages. The builder package holds all builder classes. Of course, this package has a direct reliance on the domain objects.
The domain-specific language implementation is an extra layer that uses the builders from the builder package. As a matter of fact, we will implement the DSL functions in form of Kotlin extension functions on the builder itself. This means we are going to extend the functionality of the builder itself, without modifying them.
It is important to not mix these packages as it could introduce circular dependencies. Also, it is best practice to have a strong and functional builder pattern in the first place and then focus on the DSL. The DSL will only be as good as your domain and builders can be. Note that this dependency graph is in line with the Clean Architecture proposed by R.C. Martin.
Item Implementation
As pointed out earlier, it is important to first build a solid builder for a domain object and then move forward to a DSL model. The code will be modified step by step to take into account the new functionality.
Item
package domain

class Item {
    var x = 0
    var y = 0
    var width = 0
    var height = 0
}
ItemBuilder
package builder

import domain.Item

class ItemBuilder {
    private val item = Item()

    var x: Int
        get() {
            return item.x
        }
        set(value) {
            item.x = value
        }

    // ... similar for y, width, height


    fun build() : Item {
        return item
    }
}
There are different ways to create a correct builder in Kotlin. In our version, we have decided to use a private member variable of the domain object and recreate public setters/getters which directly delegate to it. The advantage is that we have explicit and full control over the publicly accessible functionality of the builder. Note that within the “apply” block, only the public interface of the builder can be accessed. The pain point however is the repetitive code creation.
Depending of your case you might choose a slightly different version of the builder pattern.
ItemDsl
package dsl

import builder.ItemBuilder
import domain.Item

fun item(itemBuilder: ItemBuilder.() -> Unit): Item
{
    return ItemBuilder().apply(itemBuilder).build()
}
At this point the item function is a standalone function that would accessible in the global scope. In a later section, we will see that this might be problematic. For that reason, we will change the name of the top-level item to “window“. This will help to avoid ambiguous calls to the item function.
Main with Builder
import builder.ItemBuilder

fun main() {

    var item = ItemBuilder()
        .apply {
            x = 10
            y = 20
            width = 30
            height = 40
        }
        .build()

}
Main with Domain Specific Language
import dsl.item

fun main() {

    var item = item {
        x = 10
        y = 20
        width = 30
        height = 40
    }

}
Already at this stage, the second version of the main is much cleaner and more understandable than the first one. As you can see the second version is a kind of utility function, which invokes the Builder. This highlights the point to have a strong builder pattern in the first place.
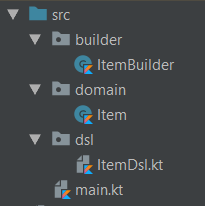
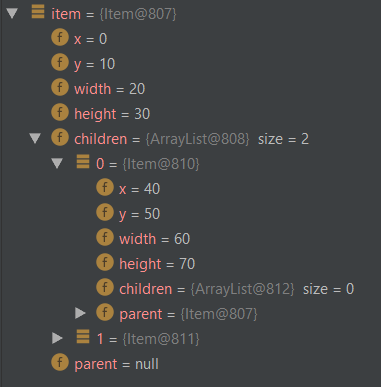
The following images show briefly how the packages are set up and how the item is configured.
Packages setup
Configured Item

Composition of Items
In the next step we will implement how we can create hierarchies of items by composing them. Each item will have a list of child objects. All child items will know if and which parent they have.
The relationship between parent and child is handled by the ItemBuilder which has now a new function for adding Items.
Item
class Item {
    var x = 0
    var y = 0
    var width = 0
    var height = 0
    var children = mutableListOf<Item>()
    var parent: Item? = null
}
ItemBuilder
class ItemBuilder {
    ...


    fun addChild(itemBuilder : ItemBuilder) : ItemBuilder {
        var newItem = itemBuilder.build()
        newItem.parent = item
        item.children.add(itemBuilder.build())
        return this
    }
}
Window and Item Extension function
As mentioned above we will change the name of the free function to window. Additionally, we create an extension function on the ItemBuilder which will use the nearly created addChild function. The extension function returns void.
fun window(itemBuilder: ItemBuilder.() -> Unit): Item
{
    return ItemBuilder().apply(itemBuilder).build()
}

fun ItemBuilder.item(itemBuilder: ItemBuilder.() -> Unit) {
    val builder = ItemBuilder().apply(itemBuilder)
    addChild(builder)
}
Now we can compose our items. Again the version with the DSL language is much nicer to read. The only disadvantage is the nearly created “window” function.
Main with Builder
fun main() {

    var item = ItemBuilder()
        .apply {
            x = 0
            y = 10
            width = 20
            height = 30
        }
        .addChild(
            ItemBuilder().apply {
                x = 40
                y = 50
                width = 60
                height = 70
            }
        )
        .addChild(
            ItemBuilder().apply {
                x = 80
                y = 90
                width = 100
                height = 110
            }
        )
        .build()

}
Main with Domain Specific Language
fun main() {

    var item = window {
        x = 0
        y = 10
        width = 20
        height = 30

        item {
            x = 40
            y = 50
            width = 60
            height = 70
        }

        item {
            x = 80
            y = 90
            width = 100
            height = 100
        }
    }

}
If we have a closer look at the created item we can see that it is configured correctly. The top-level item does not have a parent but 2 children. The children have the correct parent, but no own children.
Derived Types – Rectangle and Image
In the following step, we are going to implement the derived types Rectangle and Image. Both types will inherit the properties of the item class. The following image illustrates the inheritance chain from the Domain Objects and the builders.

To have that working we first have to open the Item and ItemBuilder class for inheritance. The domain objects will look like the following.
Rectangle
class Rectangle : Item() {
    var color = ""
}
Image
class Image : Item() {
    var source = ""
}
The idea of the implementation of the builders is, that the private Item member variable of the ItemBuilder, will be replaced by a Rectangle or an Image by the RectangleBuilder and ImageBuilder. In order to have access to the item property, it must become protected.
Both the RectangleBuilder and ImageBuilder will implement the setter and getter of their properties and delegate it directly to a casted version of the Item member variable.
RectangleBuilder
class RectangleBuilder : ItemBuilder() {

    init {
        item = Rectangle()
    }

    private var rectangle: Rectangle
        get() {
            return item as Rectangle
        }
        set(value) {
            item = value
        }

    var color: String
        get() {
            return rectangle.color
        }
        set(value) {
            rectangle.color = value
        }

}
ImageBuilder
class ImageBuilder : ItemBuilder() {

    init {
        item = Image()
    }

    private var image: Image
        get() {
            return item as Image
        }
        set(value) {
            item = value
        }

    var source: String
        get() {
            return image.source
        }
        set(value) {
            image.source = value
        }
}
With this changes, we can now compose our views items, rectangles, and images as we want.
Main with Builders
var item = ItemBuilder()
        .apply {
            x = 0
            y = 10
            width = 20
            height = 30

            addChild(
                ImageBuilder()
                    .apply {
                        x = 40
                        y = 50
                        width = 60
                        height = 70
                        source = "url"
                    }
                    .addChild(
                        RectangleBuilder()
                            .apply {
                                x = 80
                                y = 90
                                width = 100
                                height = 100
                                color = "red"
                            }
                    )
            )
        }.build()
Main with Domain Specific Language
var item = window {
    x = 0
    y = 10
    width = 20
    height = 30

    image {
        x = 40
        y = 50
        width = 60
        height = 70
        source = "url"

        rectangle {
            x = 80
            y = 90
            width = 100
            height = 100
            color = "red"
        }
    }
}