The IntelliJ IDE of JetBrains is a great choice to create and work on Ktor projects. Unfortunately, a project is missing in the community edition. In this tutorial, we will show you how to create and configure a new Ktor project in IntelliJ Community Edition by using the Gradle build system.
Intellij Community Edition and JVM
Before you can start you have to make sure that you have an updated version of IntelliJ Community Edtion installed. You can find a link at the bottom of the page to check out new versions.
Also must make sure that you have a valid version of Kotlin and JVM installed. Luckily the IDE will help you out installing all the necessary dependencies.
Create New Gradle Project
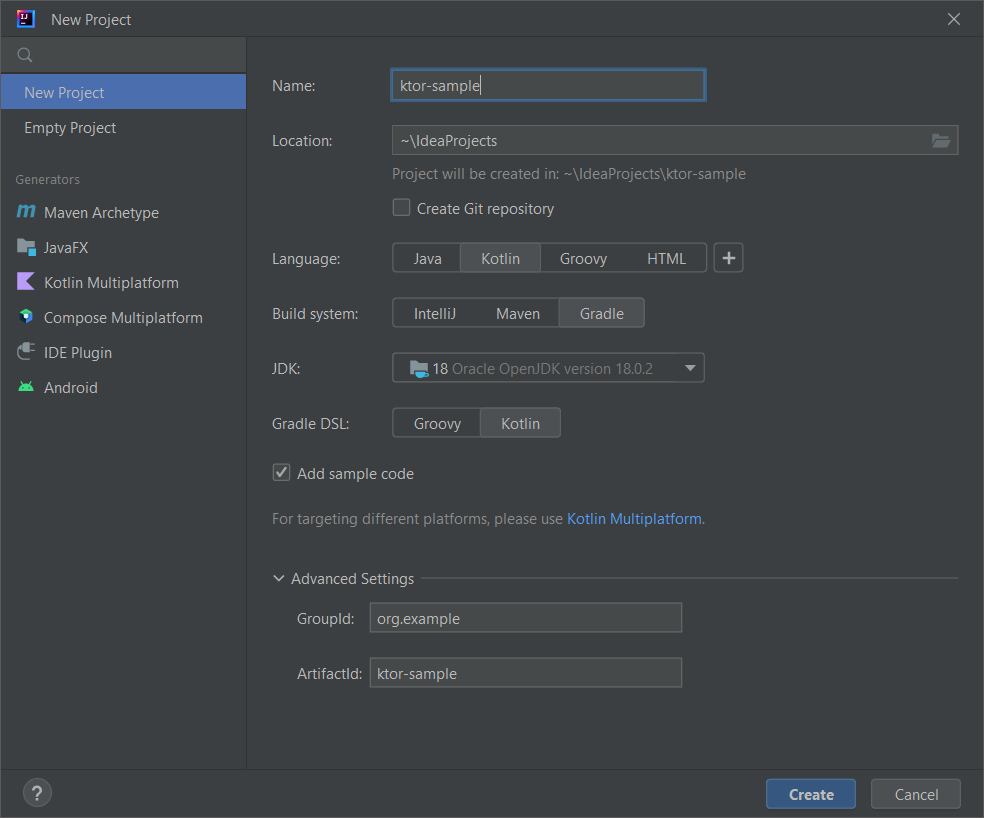
First of all, you need to create a brand-new project from the new-project wizard. We recommend using the Gradle build system. Make sure to note which JDK you are targeting and as well which groupId will be your package reference. After clicking create the Wizard will set up a new project for you. After the creation has finished, you should check that you can compile and run this simple application.
Besides, if you don’t want or cannot use the IntelliJ IDE, you can also create the same project with Visual Studio Code. We have created a walk-through on how to create a Gradle project with vscode. You can find a link to the tutorial a the bottom of the page.
Configure Gradle Files
You can start by configuring your grade files. They will make sure, that all dependencies are correctly loaded. It is important to write exactly what is written here. Otherwise, it is likely to have build failures. However keep in mind, that versions of Kotlin, Jvm, PlugIns, etc are evolving over time. So you have to check yourself which versions are playing well together.
You have to change 2 files:
- build.gradle.kts
- gradle.properties
If you have updated these 2 files you can start working on the Kotlin files of your Ktor Project.
build.gradle.kts
val ktor_version: String by project
val kotlin_version: String by project
val logback_version: String by project

plugins {
    kotlin("jvm") version "1.8.0"
    id("io.ktor.plugin") version "2.2.3"
}

group = "org.example"
version = "0.0.1"
application {
    mainClass.set("org.example.ApplicationKt")

    val isDevelopment: Boolean = project.ext.has("development")
    applicationDefaultJvmArgs = listOf("-Dio.ktor.development=$isDevelopment")
}

repositories {
    mavenCentral()
}

dependencies {
    implementation("io.ktor:ktor-server-core-jvm:$ktor_version")
    implementation("io.ktor:ktor-server-netty-jvm:$ktor_version")
    implementation("ch.qos.logback:logback-classic:$logback_version")
    testImplementation("io.ktor:ktor-server-tests-jvm:$ktor_version")
    testImplementation("org.jetbrains.kotlin:kotlin-test-junit:$kotlin_version")
}
gradle-properties
kotlin.code.style=official
ktor_version=2.2.3
kotlin_version=1.8.0
logback_version=1.2.11
Create Ktor Application Files
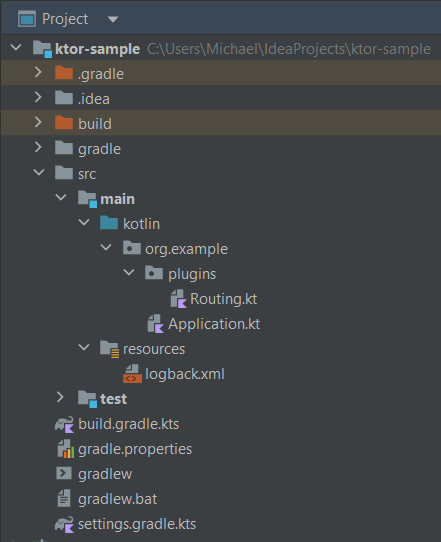
Now it is time to adapt your application files. You can get rid of your old main.kt file as it is not needed for your Ktor project in Intellij Community Edition. You have to be careful to paste your files into the correct folder structure. The folder names might differ depending on your package name (“org.example”).
- src
    - main
        - kotlin
            - org.example
                 Application.kt
                - plugins
                    Routing.kt
You have to create 2 files:
- Application.kt
- Routing.kt
The Application.kt file contains the main entry point of your application. It will start a Netty web server, which will listen on localhost and port 8080. It will pass these arguments to the application module, which will call the configureRouting function. This function is defined in the plugins section as an extension function for the application object.
The routing defines a single route (GET http://127.0.0.1:8080/) which will respond with the classic “Hello World” text.
package org.example

import io.ktor.server.application.*
import io.ktor.server.engine.*
import io.ktor.server.netty.*
import org.example.plugins.*

fun main() {
    embeddedServer(Netty, port = 8080, host = "0.0.0.0", module = Application::module)
        .start(wait = true)
}

@Suppress("unused")
fun Application.module() {
    configureRouting()
}
package org.example.plugins
import io.ktor.server.routing.*
import io.ktor.server.response.*
import io.ktor.server.application.*
fun Application.configureRouting() {
routing {
get("/") {
call.respondText("Hello World")
}
}
}Logging setup
In order to have logging correctly working you also should setup your logging configuration. To do that you have to add a logback.xml file within the resource folder of your application.
<configuration>
    <appender name="STDOUT" class="ch.qos.logback.core.ConsoleAppender">
        <encoder>
            <pattern>%d{YYYY-MM-dd HH:mm:ss.SSS} [%thread] - %msg%n</pattern>
        </encoder>
    </appender>
    <root level="trace">
        <appender-ref ref="STDOUT"/>
    </root>
    <logger name="org.eclipse.jetty" level="INFO"/>
    <logger name="io.netty" level="INFO"/>
</configuration>
Final Folder Setup
In the following images, you can see the initial and final folder structure of your newly configured Ktor project in Intellij Community Edition. You have seen how to change the gradle files in order to manage your dependencies. Also, we showed how to adapt the Kotlin code in order to have a running Webserver on localhost.